
There is a slightly weird irony to the fact that around Halloween, we tend to look for recipes for seasonal sweets, even as we prepare for an onslaught of candy. My kids are way beyond trick-or-treating age, but that doesn’t mean we don’t lay in a supply of mini candy bars for the kids who will come a-knocking outdoors.
But if you are hosting a Halloween party — for adults or children — a plastic pumpkin full of mini candies might not feel special enough.
Maybe you were tasked with bringing a treat to a school party. Maybe (like us) your building hosts a Halloween party every year for the kids. Or maybe, even though you are an adult, you still think Halloween is the coolest holiday of the year and you need to go the extra mile!
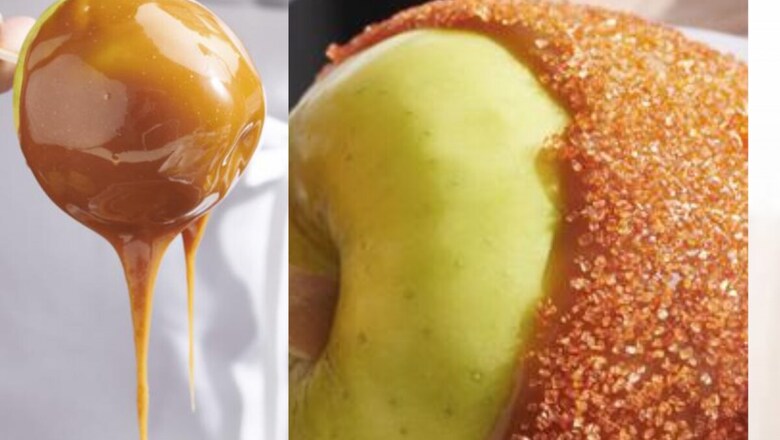
Homemade caramel apples are surprisingly easy to make and purely joyful.
You can use whatever apples you like, as long as they are firm and crisp. You want a crunch when you bite into it.
A lot of people use smaller apples because with caramel and coatings there is a lot going on. Have you seen some of those huge packaged caramels or other candy apples available during the holiday season? The kind that can feed a family of four? They are gorgeous but uh, let’s just say hard to justify.
WHAT THE KIDS CAN DO:
- Supervise like crazy if you have little ones; that melted caramel is HOT, so don’t let them touch it.
- Kids can help choose different toppings (coloured sprinkles or jimmies, crushed cookies, granola, shredded coconut). And they can dip the coated apples into the toppings of their choice.
- Another fun extra is to take fruit leather and cut it into festive holiday shapes. Pumpkins or ghosts are pretty forgiving, and then you can stick those fruity pieces right onto the caramel apples for extra Halloween flair.
- Or buy edible googly eye candies and stick them onto the apples as soon as they are almost cool.
- Putting the finished dipped apples in holiday-themed paper cupcake liners also adds festiveness to an already festive treat.
- If you are making these for Halloween, lean into the black and orange toppings.
WRAPPING CARAMEL APPLES
For to-go apples, wrap them in clear cellophane, tie them with a piece of string and ribbon, and share them with your neighbours. You can choose ribbon colours for the appropriate holiday, or for a gathering like a shower that has a colour theme.
STORING CARAMEL APPLES
You can store candy apples in the fridge well-sealed for up to five days. The apples may soften a bit as they sit. It’s best to remove the stick before storing them, as the wood will speed up the spoiling process.
This recipe multiplies easily. Just rewarm the caramel in the double boiler as directed below if it starts to thicken up (see Step 6).
- Makes 6 apples
- 6 small apples, washed
- 1 (14-ounce) package of caramels, unwrapped
- 2 tablespoons heavy cream
- 6 wooden popsicle sticks
For decorating (pick and choose):
- Sprinkles
- Crushed cookies, such as chocolate wafers or graham crackers
- Granola
- Crushed nuts
- Crushed candy, such as toffee or Halloween-colored candy canes
- Shredded coconut
- Crushed pretzelsTop Showsha Video
Method
1. Line a baking sheet with parchment or wax paper. Twist the stem from each apple and insert a popsicle stick in the top, sticking it halfway up the apple for stability.
2. Place the desired toppings in separate bowls or containers large enough for the apples to fit inside.
3. If you have a double boiler, set that up with water in the bottom. If not, grab a skillet and a saucepan smaller than the width of the skillet by a few inches. Place the saucepan in the skillet and fill the skillet with water about ½ inch up the sides of the saucepan nestled inside. Place the caramels and the cream in the top pan of the double boiler, or the saucepan in the skillet. Heat over medium heat, stirring often, until the caramels are melted and smooth.
4. Transfer the melted caramel to a heatproof surface. Dip each apple, one at a time, into the hot caramel. You may choose to coat just the bottom half or turn the apple to coat it all around with the caramel. Lift the apple up and twirl it gently to allow excess caramel to drip back into the pan
5. Dip the apple into the toppings of your choice. You may use more than one topping for each apple; either lean different sides of the coated apple into different toppings or sprinkle some of the toppings over the apple, holding the apple over the toppings in their container.
6. If the caramel starts to firm up before you have dipped all of the apples, return it to the heat over simmering water, and stir frequently until it is liquid again. You can also put it in the microwave and heat it for 15-second bursts, stirring between each one.
7. Place the decorated apples on the lined baking sheet, transfer the tray to the fridge, and let cool and set for at least 1 hour. Place in cupcake liners if desired.
Read all the Latest Lifestyle News here


Comments
0 comment